Sunday, October 30, 2011

Mom's Survival Pack

Mom's Survival Pack
I've decided that every new mom needs an amazing survival Gift Pack. And I've decided that I am going to make a new mom survival pack and give them to each and every new mom that I know.
This is not your feel good, snuggly kind of gift pack you give a mom. You know the kind....Slippers and bubbles and all that stuff that people think a new mom needs so she can "pamper" herself.
HA! Pamper yourself? Seriously? We need to give moms a real survival pack. A pack that when REAL life hits her she will fully appreciate the gift.
And here is what I think we should include:
Ear Plugs: Because let's face it.....Ear Plugs can and will be your best friend. You can use them for not only your children but your husband too. You will need them for everyday life. For the car....For the house.....For when you need to take a bath....Or just gather your thoughts. Trust me......Silence will never be experienced in a non artifical way again. So, just face it and put your ear plugs in.
Sunglasses.... WITH BLINDERS. Believe me you will need blinders. The Blinders will help in ignoring everything around you. Trust me you will need them. There will be lots of days that you can't take it anymore and pretending that it just doesn't exsist will be your best bet.
Blinders will help.
OK....Obvious I'm sure, but Tylenol....You will need it. You will need it for your body pains, your head pains, and your everyday life pains.
Boxed Wine....You gotta have it. Learn to love it (If you don't already) and keep it in the fridge. Drink it and Drink it and then Drink it some more. Use a sippy cup if you must but drink it.
Door Locks.....Get them and USE THEM. They will work well for locking the houdlems out of the bathroom, the bedrooms, wherever you don't want them. Baby Gates don't work great....they can escape from them. Tear them down or climb them. So, just get door locks and just lock them out.
OK....Let's just be real here. You're not going to make it without Xanax. At some point in motherhood you are going to need them. So, just get real now. See your Doctor (Since I can't legally supply the Xanax. lol) And get yourself a nice supply of them.
Otherwise I may throw in some things like Ambian and Nyquil. (For the mom) Some Benadryl (Trust me all you NEW moms you'll know why we use that soon) and maybe some duct tape. Cause when all else fails duct tape fixes everything. You can use it for all kinds of things. ;) *taping mouths, taping hands, taping kids to walls*

Pumpkin and Bat Gourds

Pumpkin and Bat Gourds
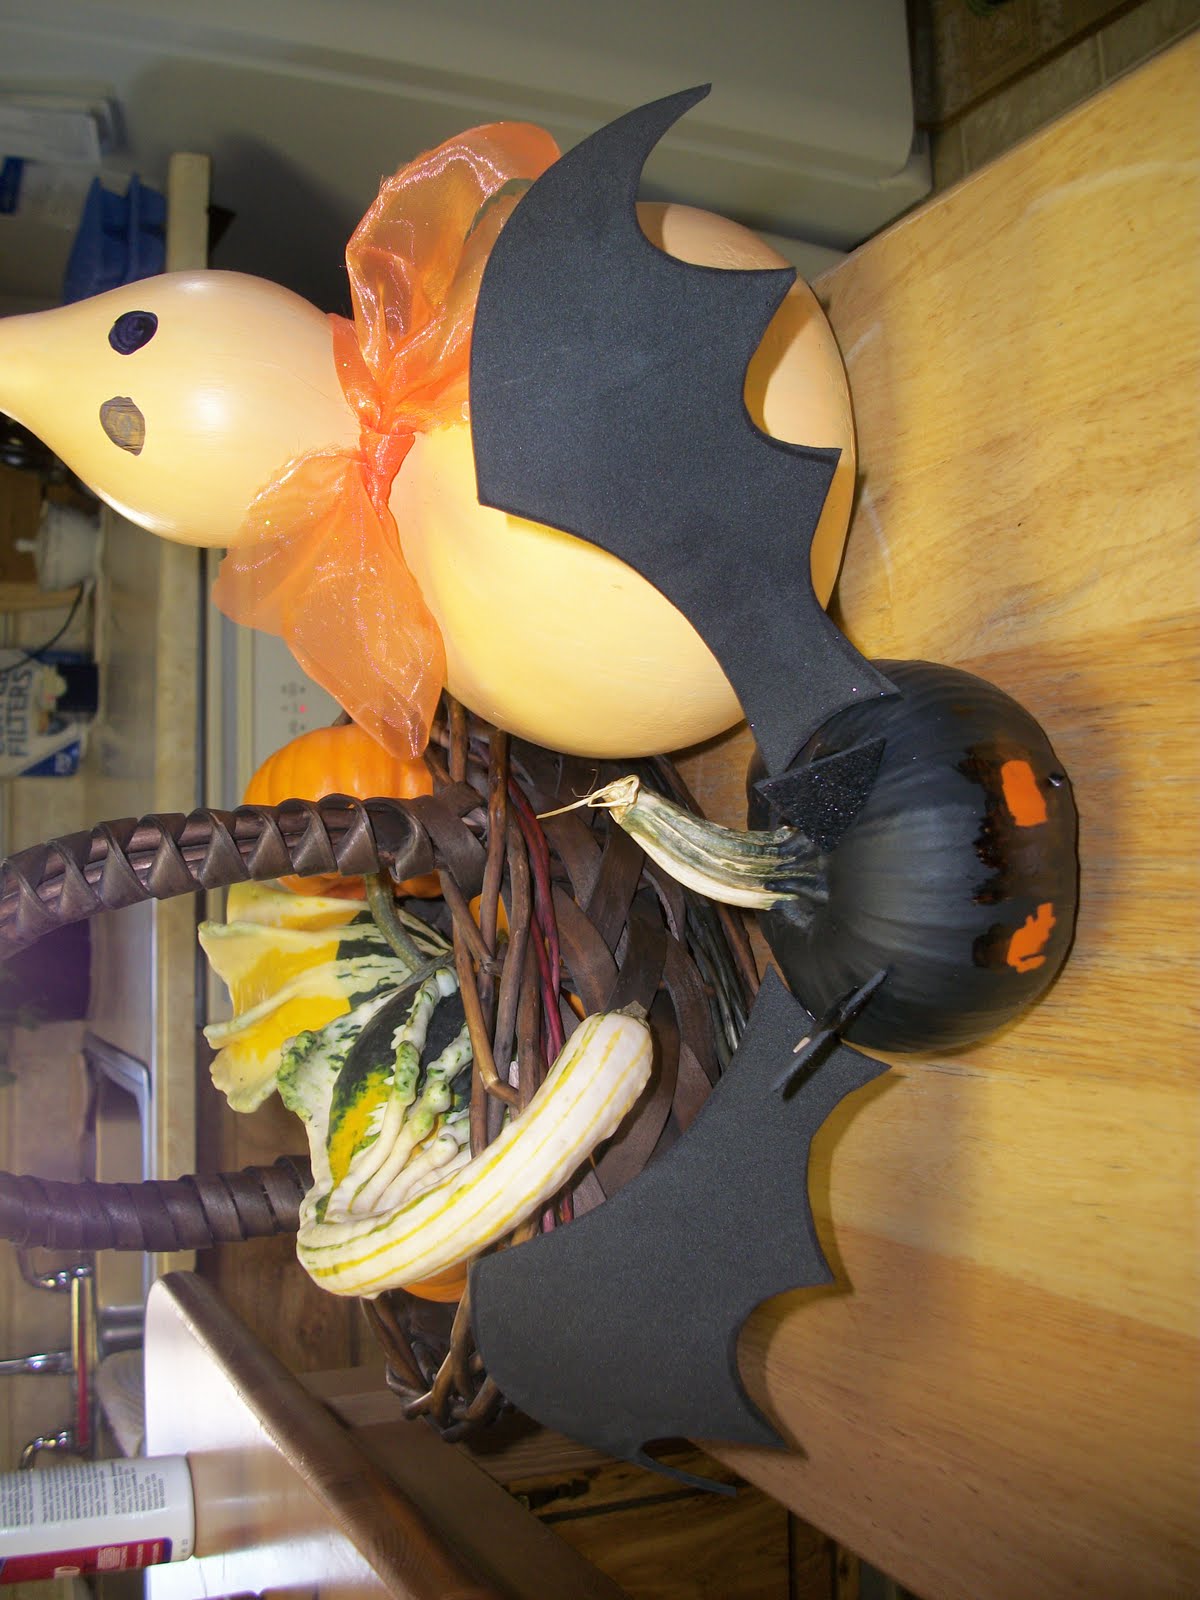
Something fun to do with the kids around here for halloween is to paint the gourds and make fun stuff with them. I'm not big into carving pumpkins and this is a great alternative.
Here are two examples of some fun things to make.
The Bat: The Bat is made of a little pumpkin. Painted black except for the eyes (Now we did have to help the eyes out a bit because Brother Baer was painting and he is 6. So we used a marker to straighten them up a bit for him.) Once the bat is dried black take 2 pieces of black felt and cut the ears out. Attach the felt ears to toothpicks and insert. Do the same with the Bat wings. Use a skewer to attach the back of the wings to keep them straight. I used black electrical tape to tape the toothpicks and skewers on the felt. And then stick them into the pumpkin. Super Easy and Super fun for kids!
The Ghost Gourd is made from a Birdhouse Gourd grown in my moms garden. She made this with Brother Baer while I was in the hospital recovering. It's so adorable!!!
She mixed orange and white paint to create this light orange color and then had Brother Baer paint it. She then allowed it to dry and helped Brother Baer paint the eyes on. Then just tied a ribbon around his neck to finish him off!
You could paint these completely white and have real ghosts too.


When things go bump in the Night!

Ouch!
So, around 4:00 AM this morning I was up to pee (Thank you four children) and on my way to the bathroom I checked on the kiddos. Babies were sleeping fine. Brother Baer was awake and "talking" in bed. I told him to go to sleep. He says, crying, that he had fell and smacked head head off his side table. I said..."It's fine go to sleep you shouldn't have been playing around anyways" and continued on my way....
Imagine my *Bad mom* moment this morning when I awake to this....Poor Brother Baer really did hurt himself and his mean, overtired mom told him to go to bed, he was fine. Talk about feeling guilty. I need to remember to always check out a bump in the night and to not assume that the kiddos are making up stuff for attention in the middle of the night. *sigh*

Saturday, October 29, 2011

Camping

Camping - Baer Style
My life has been a bit on the crazy side this week (OK crazier than usual) I had surgery and was in the hospital and now I'm "man down" I can't lift my kids or lift anything. I am basically useless. LOL And at the mercy of everyone else. Which, being the *crazy control freak* Super mom I am is really really hard.
I hate this. But one of the fun things that came from the week is Papa Baer camping with the kids. Family fun night was just them with me watching this time.
Papa Baer moved the furniture and built tents in the living room. Gathered flashlights and a camping latern and they all played in the tents. Baby Baer and Little Baer of course loved it and had a blast. Brother Baer enjoyed himself too as he chased the babies in and out and around and around.
Brother Baer is all about "Family Fun nights" these days and can't wait to have them. The simple things like building a tent and camping in the living room are things that memories are made of.
So, as I sat here watching them enjoying the camping fun I remember what amazing little kiddos I have. And how much they love their daddy and their papa Baer time. They don't need lots of toys and expensive presents. Just time...And it's so fun to watch them grow and learn all the fun things they do when you sit and enjoy the fun.
And sometimes, when you let go and let others decide the fun things to do you move furniture around and do silly things. And that's totally awesome in my book! maybe I should relax and let go more often.

Saturday, October 22, 2011

Trunk or Treat Castle Theme

Trunk or Treat Castle Theme!
For Halloween this year we did a Fairy Tale Land Theme. Complete with the Castle for Trunk or Treat. If you want to know how to create the Knight, Princess and Dragon costumes check out the other blog posts!
This will tell you how to create your "Castle" design for the back or your SUV, mini van, truck or even a trunk.
This was super easy and literally cost less than $10.00 to create! (Could be less!!!)
I took a trifold Cardboard display (one you
would use for a science project. Now I had
this at home so I spent nothing. You could
use cardboard to reduce the cost as well. But
this cost about $8.00 when bought new!)
I cut the top with a box cutter to the shape I wanted. You could go fancy, I didn't. Just simple castle shapes. I also cut the door on the top and both sides but left the bottom in tact for the draw birdge) then I spray painted the whole thing with silver paint. Once dry I used a marker to draw on the stone. I bought 3 ft of light chain. ($3.58 total) and attached the chains on both sides of the draw bridge. I used wooden skewers and attached red felt to the tops as the flags and stuck them into the cardboard at the top! The great thing about the trifold is that it can be adjusted with the actual size of your "trunk" and there was no need to measure. If you have only cardboard I would just measure the space you need it to fill and then cut from there!!!
I attached the chains with some hardware I stole from papa Baer's work bench (shhh!!!!) and it worked perfectly!
Here is everyone together ready to go!!!!
I did put the candy inside the Castle and the kids
could reach into the draw bridge to retrieve their candy!
With a super small budget and a desire to make a big impact I designed and created the 3 costumes and the Castle for the Trunk for less than $50.00 for EVERYTHING!!!!

Homemade No Sew Princess Costume

Homemade No Sew Princess Costume

So to finish out the 3 Baers costumes this year little Miss Baby Baer was transformed into a Princess. this costume was completely no sew. BUT....I must say I did not make the tu-tu. I had a tu-tu that someone had given me for her and we just used the tu-tu and created the colors and costume around that. Tu-Tu's are big these days so I figure a lot of people have them already. If so use it! And create the costume colors around the tu-tu.
I have no idea how to make a tu-tu so I can't say if you have to sew it or not. LOL (Just an fyi)
Supplies needed:
Scrapbook paper (glittered style)
1/2 yard tulle
jewel embellishments
glitter glue
foam craft wands
foam stickers
I got the foam stickers, ribbon, jewels and scrapbook paper all at Walmart in the clearance section. The Foam wands at the dollar tree. The entire cost of this costume was $10.00!!!! (Spending $3.00 on the tulle)
I created the hat by rolling a piece of the scrapbook paper into a tube and sizing it to her head. Leaving a small hole at the top to thread the tulle into. Once it was sized correctly I just stapled it together (The staples will be covered) and decorated with the jewel embellishments and foam stickers. I cut the tulle in half and threaded the tulle into the top of the hat and secrured it to the inside with *packing tape* (shhh....) and then made 2 slits on either side of the hat and threaded a long ribbon that went through and out the other side to secure it to her head (Tied under her chin)
She modeled the hat for me!!!!!
I then just decorated the foam wand with the
jewel embellishments with glitter glue and the
foam stickers.
Super Super Easy! I had ideas of different shirts but the freezing cold temps of PA in October changed my plans. I just put a turtleneck under a onsie that said Little Princess. And then double layered a pair of purple tights under a pair of pink tights. And her costume was totally done!!!!
Check out the other Blog posts for the rest of the fairy tale land and the castle to finish off the trunk or treat theme!!!

Homemade No Sew Dragon Costume


Homemade No Sew Dragon Costume
Along the Fairy Tale Line (see other Blog posts for the Knight, Princess and Castle) Little Baer was a Fierce Dragon!
although he didn't look very Fierce he sure was adorable!
This Costume was really super easy and can be made literally in an afternoon! With no sewing and for less than $15.00
Supplies:
Black Hooded Sweatshirt with Zipper
Felt in desired colors (I choose purple and green)
Spray adhesive
Fabric Glue
Cardboard
Wings (I bought a bat at the dollar tree)
I glued the wings to the back of the sweatshirt (I actually had to remove the "bat" body from the wings with wire cutters.
Then I used felt pieces to cut the spikes to go down the back of the costume. I cut 2 pieces and glued them together at the spikes leaving enough space at the bottom to "open" the 2 pieces to then glue them to the sweathirt. Once the spikes were glued to the back and top of head I used the spray adhesive to stiffen them and make them stand up better. to have them flow down the head of the sweatshirt you will need to cut the felt in different spots to create more of a "bowl" the easiest thing to do is to actually place the hood of the sweatshirt over top of an upside down bowl to form as a head would be.
Cut your scaled out of felt. You will need A LOT.
you will want enough scales to cover the front of the sweatshirt, down the back (to cover the felt where you glued it) and the tail completely. So I decided on triangle scales. But half circle ones would be great as well!
Once you cut them cut out just glue them onto the sweatshirt. remember to place something in between the fabric so you aren't glueing the fabric together.
Once the front is dry you can do the back!
I covered the green spikes with purple scales down each side. and over the wings. Once all the scales are glued I sprayed a layer of spray adhesive over top of the entire thing! then let dry as you construct the tail.
To construct the tail I cut from cardboard the shape and length I wanted. Then simply covered it with scales using the same technique. I used the same spikes for the top of the tail as I did down the back. And I left about 4 inches of felt at the top of the cardboard so that I could attach to his body. I'm telling you fabric glue is my friend!!! I then spray it with the spray adhesive as well. Once the tail is dry I simply cut a few holes about 4 inches from the top of the tail (In the extra fabric you left) and then feed thick ribbon through and tie around the waist underneath the costume.
I then just put black pants on him and he was DONE!
Super easy and super cheap to add to our fairy tale!!
See the other blog posts for the entire Fairy Tale Collection! Totally New Sew and totally Frugal! (I don't wanna be cheap... LOL)